Shopify Poll Maker: Embed in Minutes
Add an interactive poll to any page in your Shopify store and start gathering customer opinions. No coding and no app install needed. Just paste the embed code into a page or product description and you’re live.
- ✓ Free to use
- ✓ No credit card needed
How to Add a Poll to Your Shopify Store in 3 Steps
Shopify’s native tools focus on what happens after a purchase. But when you want quick opinions in the moment, like which color to launch, which collection should get the homepage spotlight, or what products customers want next, you need something simpler and faster.
A poll embedded directly in your store lets visitors share their opinions before they buy. It’s an easy way to learn what your audience wants while keeping them engaged with your store.
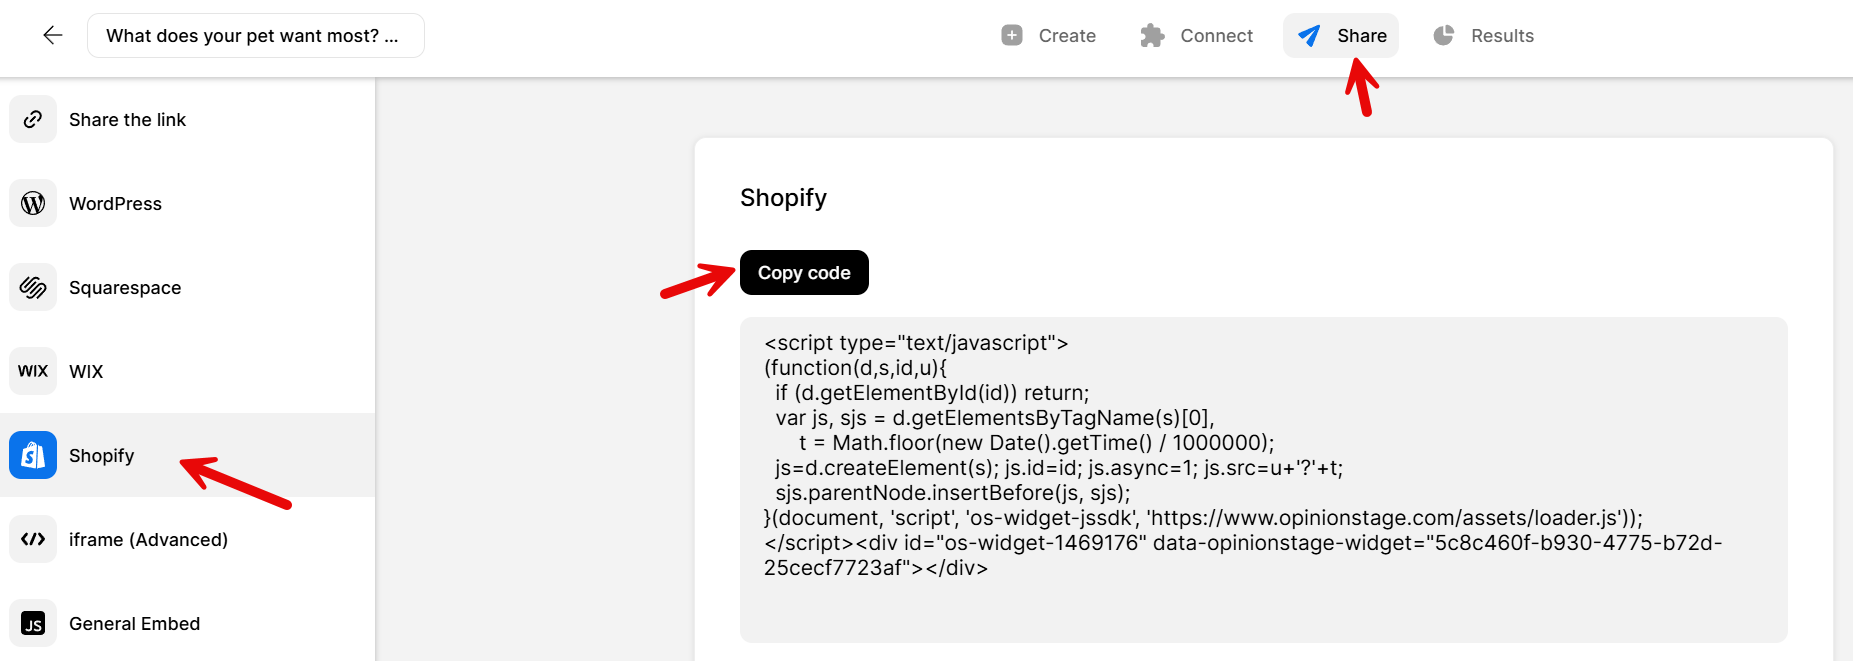
2. Copy the code
Click on the Share button located at the top of your screen and then click on the Shopify tab. Copy the embed code.
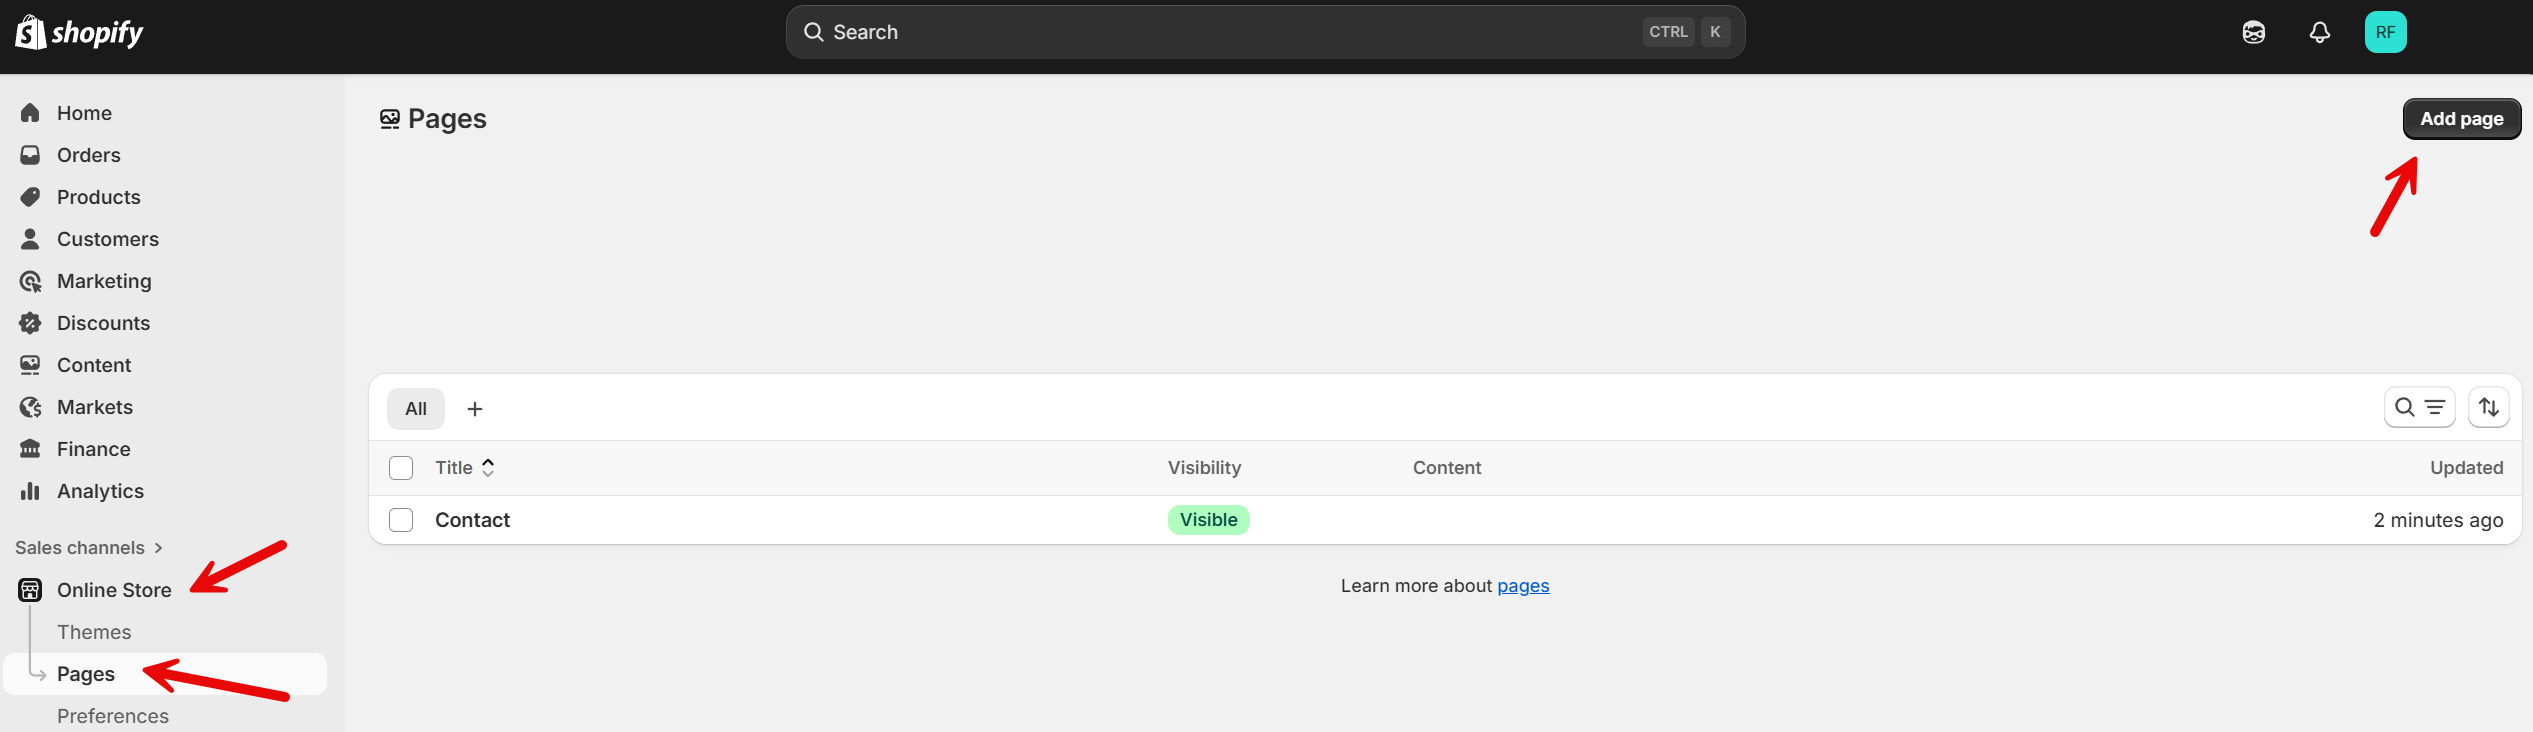
3. Paste the code on your Shopify site
Sign in to your Shopify account and head to your dashboard. On the left side, click Pages. From there, either add a new page or choose an existing one where you want to embed your poll.
Click the <> icon and paste your embed code into the box. Once everything looks right, click Save.
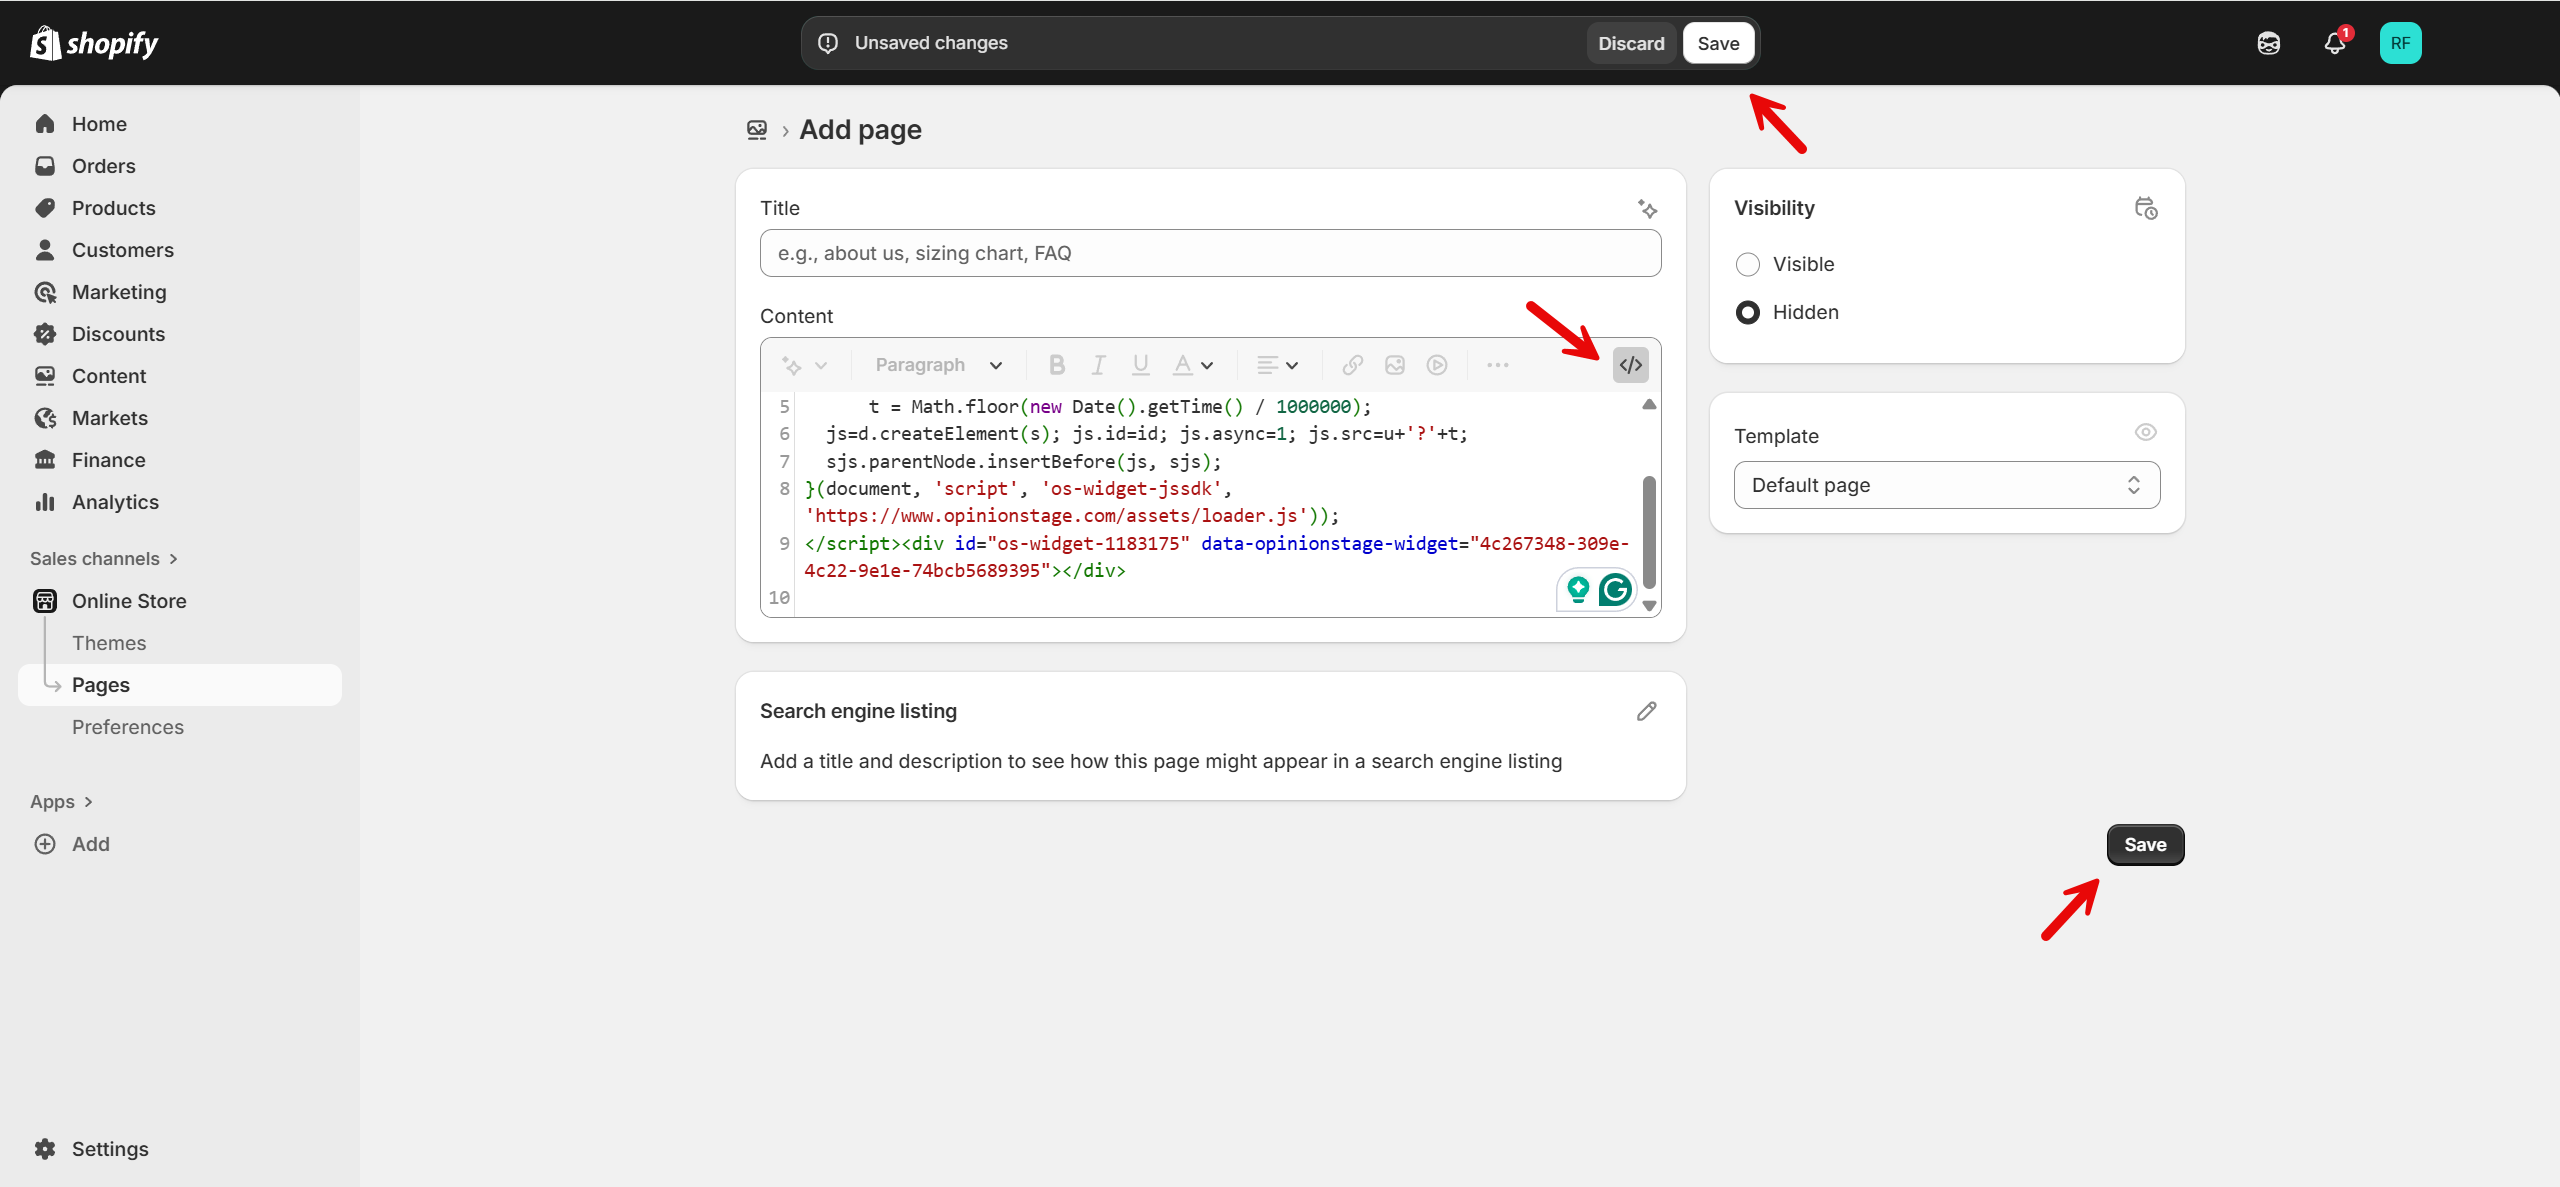
And now you’re done!
Why Use Opinion Stage’s Poll Maker on Shopify
Opinion Stage’s poll maker is built for Shopify merchants who want to gather customer input without installing a Shopify voting app or touching code. Here’s what else an Opinion Stage poll can do:
Embed Anywhere in Your Store
Drop a poll into a product page, collection page, homepage, or blog post without editing code or involving a developer.
Visual Polls That Match Your Brand
Use product images as answer options, match your brand colors and fonts, and choose layouts like thumbnails or lists so the poll feels native to your site.
Capture Leads Alongside Responses
Add an optional lead form after voting so you can follow up with discount codes, restock alerts, or product updates. This turns casual opinions into qualified leads tied to real preferences.
Real-time Results Without an App Install
See responses come in live in your Opinion Stage dashboard, without having to install another Shopify app.
Where to Embed Polls in Your Shopify Store
A poll works differently depending on where it lives in your store. Here’s where Shopify merchants embed polls and what each location is good for.
On a Product Page
Embed a poll directly in a product description to learn what shoppers prefer, from color and variant choices to potential new features. This is especially useful for products with multiple options, helping you identify which ideas or variants get the most interest to guide future product decisions.
On a Collection Page
Place a poll above or below a collection grid to find out which products should be featured next, which deserve a discount, or which direction your next collection should take.
On the Homepage
A homepage poll engages visitors the moment they land on your store and shows that your brand values feedback. Use it to test new collection ideas, campaign concepts, or brand direction. Even if visitors don’t convert right away, the interaction helps build familiarity and encourages return visits.
On a Blog or Content Page
If you publish content like style guides, product roundups, or behind-the-scenes posts, embedding a poll adds interaction on top of reading. It helps you capture preferences tied to the topic and consistently drives higher engagement than static comment sections.
Shopify Poll Maker FAQs
Can I add a poll to my Shopify store without an app?
Yes. Opinion Stage gives you a Shopify-specific embed code in the Share screen. Copy it, open the Shopify page editor, click the <> icon, paste, and save. The poll will then appear on your site. There’s no Shopify app to install and no theme code to edit.
Where can I embed a Shopify poll?
Anywhere in your store that accepts HTML – product pages, collection pages, blog posts, the homepage, or custom landing pages.
How do I create a free Shopify poll?
Sign up for an Opinion Stage account, build your poll using our AI builder, a template, or from scratch, and copy the embed code from the Share screen. Paste it into the HTML view of any Shopify page. The free plan covers unlimited polls with lead capture. Paid plans offer additions like more responses and advanced customizations.
Can I capture leads with a Shopify poll?
Yes. Every poll can include an optional lead form that appears after the vote. Use it to send discount codes, restock alerts, or campaign updates tied to the specific answer the customer chose, letting you segment leads by preference automatically.
What's the difference between a Shopify poll and a Shopify survey?
A poll is a single-question format with multiple-choice answers, designed to capture quick opinions. A survey includes multiple questions and is used when you want more detailed, structured feedback. Polls are best for product and content pages where you want fast engagement, while surveys are better suited for post-purchase feedback or dedicated research.
Other Ways to Engage Your Shopify Audience
Polls are just one of the tools you can use in your Shopify store. Depending on what you’re trying to learn, these formats may fit better.
- Shopify Quiz Maker: Build product recommendation quizzes that match shoppers to the right items. Best for stores with broad catalogs where customers need help choosing.
- Shopify Survey Maker: Run multi-question surveys for deeper feedback. Best for post-purchase research, NPS, or customer satisfaction tracking.